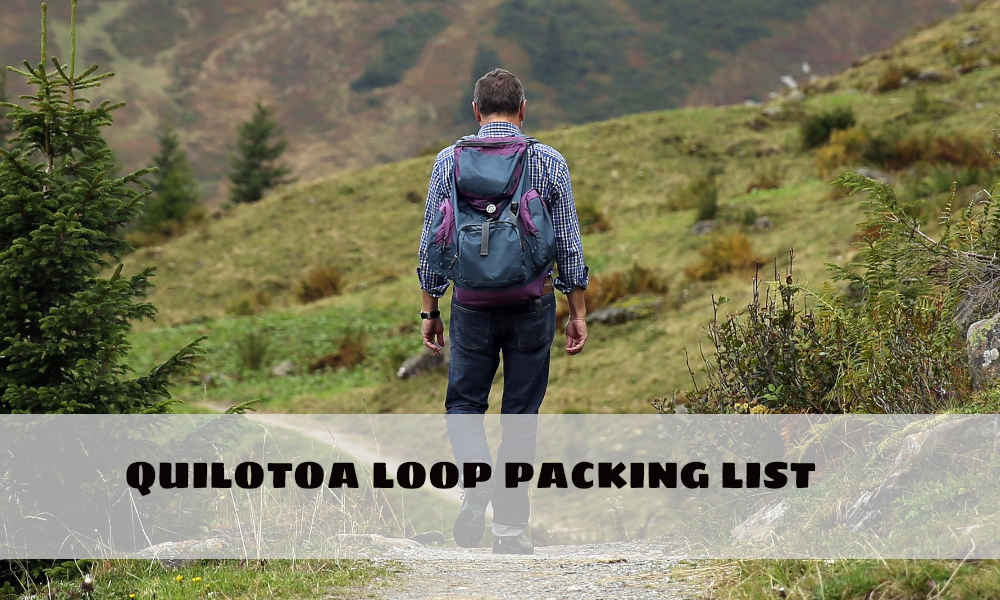
Embark on an Epic Adventure: The Quilotoa Loop Packing List You’ll Ever Need for a Successful and Memorable Trek!

Quilotoa Loop Packing List: The Quilotoa Loop is an incredible way to immerse yourself in the breathtaking highlands of Ecuador’s Andes Mountains. Connecting with nature and rural areas while traveling can add a unique layer of experience to your journey. It’s like savoring every layer of a cake rather than just the toppings.

If you’re interested in learning more about seeing one of the most exquisite crater lakes in South America, check out our comprehensive Quilotoa loop guide on this 3-day trek. It is a wonderful journey for new and experienced trekkers, can be completely self-guided, and the views are stunning.

QUILOTOA LOOP PACKING LIST

Quilotoa Loop Packing List

Our packing list is not for the minimalist trekker. It is for the type of adventurer who would like to be thoughtfully equipped for any situation. Noted certain items as optional, with the intention that these items could make the overall experience more enjoyable.

Ideally, you’ll want to keep your pack as light as possible– less than 10 lbs (or 4.5 kg) is a good place to be. This is particularly important if you are a beginner trekker. After some time, every ounce of weight on your back begins to feel like a ton of bricks! Remember that you may not end up using everything (first aid, safety whistles, GPS, etc.), but in those rare instances, they may also save your life, and you’ll be thankful you brought it.

Travel Necessities

  • Printed Quilotoa Loop trekking guide (if possible) or phone screenshot
  • Travel Insurance
  • Enough cash for all accommodations and snacks (US Dollars)

Electronics

  • Travel adapter
  • Chargers and cables
  • Smartphone – Airplane mode on to avoid roaming charges with WiFi on and offline maps for every town pre-downloaded
  • Instructions in point #7 on downloading offline Google Maps
  • Kindle E-reader or book (optional)
  • Headphones // wireless earbuds (optional)
  • Camera (optional)
  • Power bank (optional)

Clothing

Keep in mind that you should be packing mostly athletic, lightweight, synthetic clothing that wicks moisture quickly.

  • Underwear
  • 1 sports bra (women)
  • 2 long-sleeve or short sleeve synthetic shirts
  • 1 set of sleeping clothes
  • 1 shirt to wear at the hostel
  • 1 pant to wear at the hostel
  • 2 pairs of Merino wool hiking socks
  • 1 mid-weight fleece or soft-shell jacket (men’s and women’s)
  • 1 waterproof rain shell (men’s and women’s)
  • 1 hiking bottoms or leggings (men’s and women’s)
  • 1 beanie hat
  • 1 hat with brim or bill for sun protection
  • 1 bandana or buff for neck sun protection
  • 1 swimsuit (optional if you plan on using Llulu Llama’s hot tub)

Trekking Gear

  • 22L to 28L backpack
  • Backpack rain cover (or a rain poncho works well)
  • Hiking shoes/boots with good tread to hike through rain, loose dirt, and mud
  • LED headlamp
  • 5 to 2L refillable water bottle or hydration reservoir
  • Several plastic bags to hold your trash (leave no trace)
  • Signaling safety whistle
  • Compact first aid kit
  • Sunglasses
  • Snacks
  • Trekking poles (optional)
  • Quick drying and lightweight microfiber towel(optional)
  • Sports wristwatch with alarm (optional)

Toiletries (travel-friendly)

  • Daily skin moisturizer
  • Face cleanser
  • Medicine (general assortment)
  • Toothbrush, toothpaste, and floss
  • Shampoo & Conditioner, or pack your own in these reusable bottles
  • Sunblock
  • Comb
  • Contact solution and lens case
  • Deodorant (women’s//men’s)
  • Chapstick
  • Optional: face wipes, q-tips, hair ties, bobby pins, stain remover pen, antibacterial gel
  • Toilet paper/tissues
  • Blister care/moleskin(pre-cut moleskin into small pieces)
  • Electrolyte replenisher powder mix sticks (optional)
  • Small notebook and pen (optional)


In conclusion, having a well-planned packing list for the Quilotoa Loop trek in Ecuador can make all the difference in having a comfortable and enjoyable experience. From appropriate clothing and footwear to essential gear and personal items, each item on the list should be carefully considered and prioritized based on your individual needs and preferences. With the right packing list, you can feel confident and prepared for the challenges and adventures that await you on this stunning trek.

If you have any other questions about the Quilotoa Loop packing list, feel free to drop a line in the comments below.


Unleash Your Inner Adventurer: Quilotoa Loop Trek – A Must-Do Experience for Outdoor Enthusiasts

The 3-day Quilotoa loop trek is a short yet powerful journey that weaves through the spine of the Andean Mountain range in Ecuador. It is undoubtedly one of the best ways to appreciate the undulating beauty of the highlands, experience rural landscapes, see simple towns, and take on a physical challenge. This is a great route for trekkers of all levels– from beginners with great attitudes to more experienced folks who have been on world-class treks.

Quilotoa loop trek

There is something soulfully satisfying about taking off a backpack at the end of a trekking day, stretching your legs in a hammock, and eating a hearty home-cooked meal. It’s a special way to connect with nature and appreciate the varying landscapes that each country has to offer. We sincerely hope this is something everyone can experience for themselves. In this guide, we’ll take you through everything you will need to know to plan your own self-guided Quilotoa loop trek in Ecuador, and our Quilotoa Loop Packing List will be handy when you travel.


Thoughts on self-guiding or getting a Quilotoa loop tour guide

There are always pros and cons of self-guiding versus going with a tour company. A tour company can be great if you have limited time to plan, need extra help carrying your belongings, would like explanations on points of interest or natural surroundings, or want to guarantee you’ll be traveling with a group. There are a lot of factors to consider before making this decision.

The Quilotoa loop is a relatively short trek and is simple enough to self-guide– even if you are a first-timer. In order to do so, you will be taking on a small (yet enjoyable) challenge of planning logistics, navigation, and carrying your own supplies. Another perk of self-guiding anything is that you’ll save money and have the autonomy to choose where you stay. We spent only $100 for transportation, lodging, and supplies for this 3-day Quilotoa loop trek.


Cost for the Quilotoa Loop trek for one person

Category Detail Amount
Bus Ride from Quito to Latacunga $2.15
Food Supermarket snacks and lunch $3.25
Taxi Private car ride from Latacunga to Sigchos $25.00
Lodging Hostal Llulu Llama, half board, private twin room $24.00
Lodging Black Sheep Inn, full board, dormitory $35.75
Food Celebratory beer and chicken soup in Quilotoa $5.50
Bus Ride from Quilotoa to Zumbahua $1.00
Bus Ride from Zumbahua to Latacunga $1.50
Taxi Latacunga bus station to Hotel $1.50
Total $99.65

( expense depends on several factors such as seasonal, inflation, date of visit, holiday, etc.)


One of the challenges when planning a Quilotoa loop trek is the limited availability of trail information. Many people have reported getting lost or finding the maps to be unreliable. Avoiding getting lost is crucial, and it is important to gather as much information as possible beforehand, including taking every map available at each hostel and speaking with locals along the way. This guide includes helpful notes gathered from previous research, as well as new insights collected during the trek. It is an invaluable resource for anyone planning a self-guided Quilotoa loop trek in Ecuador, and we are excited to share it with you!

A word of advice: you’ll want to download offline maps (see instructions in point #7 on downloading offline Google Maps) beforehand, and if possible, have a printed guide handy to refer to every step of the way (or save the screenshot on your phone). The Quilotoa loop trail is safe, with the exception of some territorial dogs, which may growl if you get too close to the property line.


Which direction should I choose for the trek?

You can choose to go the traditional (beginning in Sigchos) or the untraditional route (beginning in Quilotoa). While some may argue that going the untraditional route is easier (with fewer ascents), the trek will have difficult moments in either direction. We recommend going the traditional route to end with a spectacular finish at the Quilotoa crater lake. Our guide is written for the traditional route, which goes from Sigchos to Insilivi, then Chugchilan, and ends in Quilotoa.


What is the total distance for the Quilotoa Loop trek?

The first day of the Quilotoa loop from Sigchos to Insilivi is 14 kilometers (km) which are fairly flat with an ascending burst towards the end. The second day from Insilivi to Chugchilan is more demanding than the first due to undulations with an overall distance of 12.4km. The final day from Chugchilan to Quilotoa is 10.3km, which is the most difficult yet rewarding day, with several ascents to yield a drool-worthy view of the caldera. The total distance for the 3-day trek is 36.7km, which is 22.8 miles.


Where to stay on the Quilotoa Loop trek

The Quilotoa loop trek hasn’t become a huge sensation (yet), so it is relatively easy to do walk-up reservations. We personally prefer to reserve in advance for peace of mind, but that is up to you. The town of Insilivi is quaint and has only two places to stay– Hostal Llulu Lllama and Hostal Taita Cristobal. Currently, the best way to reserve in advance is to email them.

Hostal Llulu Llama is infamous for its relaxing environment and good meals, so you may want to make a reservation if your heart is set on staying there. Chugchilan has many more options, including the creative ecolodge we stayed at called Black Sheep Inn, as well as Hostal El Vaquero, and Hostal Cloud Forest to name a few.

If you decide to spend an evening in Quilotoa after your trek, there are also numerous accommodation options available. Otherwise, you can return to your lodging in Latacunga by taking a bus that runs from Quilotoa to Latacunga. Wifi is available at certain locations in Chugchilan and Quilotoa but may be harder to find in Insilivi.


Quilotoa loop weather

During our three trekking days, the sky would quickly change from moody clouds to piercing sunshine, flip over to light rain, and end with brisk evenings. In Ecuador, the dry “winter” season typically occurs from June to September, and the wet “summer” season runs from October to May. It’s best to prepare for all elements by bringing multiple layers, sun protection, and always having a rain jacket or poncho handy. You will not encounter any snow.


Staying well-fed and hydrated during the trek

On the first day of your trek, you’ll want to set off with your meal and water supply. Latacunga has a large mercado or supermarket conveniently located next to the main bus terminal. This is a great place to buy your lunch fixings, such as nuts, granola bars, or ingredients to make peanut butter and jelly sandwiches (such as we did). Depending on how much water you typically drink, it is a safe bet to bring 1.5 to 2 liters with you, as there are very few opportunities to buy more supplies along the route.

Most of the accommodations along the Quilotoa loop offer half-board, which means dinner and breakfast are included in your stay (the food at Black Sheep Inn is phenomenal). Some of the lodges will also include or sell bagged lunches. If you want to save money, it is best to buy your supplies beforehand.

.

What should I pack for the Quilotoa loop tour?

You don’t need anything special besides your legs, positive energy, and sense of adventure for this trek (although some specific items will ensure your experience is a lot more comfortable). We got a lot of use out of our trekking poles on days 2 and 3 because they had some serious incline and muddy landslide areas.

The most important item you’ll want to have is a good pair of athletic shoes to help mitigate blisters and twisted ankles. Ultimately, you will want to carry as little weight as possible to make the journey more enjoyable. You will also want to bring enough cash to cover all lodging and food, as there are no ATMs. We’ve written up a comprehensive Quilotoa loop packing list which will help get you prepared for this epic experience.


Is altitude sickness a factor?

Quilotoa’s elevation is marked at 12,841′, which is 3,500′ more than Quito (the second highest capital in the world just underneath La Paz, Bolivia). There’s a chance you may experience altitude sickness depending on where you are coming from. If you are traveling from the coast, such as Guayaquil where the elevation is 13′, you will want to give yourself several days of acclimatization in the highlands before setting off on the trek.

Another option is to bring altitude sickness medicine which is available by prescription. We chose to take altitude sickness medicine because we traveled from California to Ecuador the day before we started the trek and didn’t want to take the risk. You should be fine if you are traveling from Quito, as the altitude gain on days 1 and 2 of the trek is fairly modest.


Situate yourself in Sigchos or Latacunga the day before you begin the trek (traditional route)

The Quilotoa loop trailhead is located in the small town of Sigchos. It is possible to stay there overnight, but there are limited options for lodging and restaurants. Expect a very quiet evening if you do stay in Sigchos. Most people choose to stay in the city of Latacunga, which we recommend doing. You should be able to store your luggage at your lodging in Latacunga (some places charge a daily fee, such as Hostal Tiana), move your essentials over to a backpack, and trek with only the items you’ll need. Latacunga is an enjoyable place with several lovely churches, museums, and a small outdoor marketplace, and it easily connects via bus to other nearby cities (including Quito).


How to get from Latacunga to Sigchos

You can take a 2-hour ride on the public bus (departure at the main Latacunga bus station) to get from Latacunga to Sigchos for $2.00 or so. If you ask politely, Hostal Tiana has a copy of the trek instructions and the bus departure timetable that they can provide to you. Most days, the bus departs at 9:30 am, which is an excellent time to set off for your first day of the trek.

If you happen to be traveling on a Sunday, keep in mind the timetable may be drastically different. We were unpleasantly surprised to learn there was no 9:30 am departure that day and ended up making the decision to take a $50.00 taxi ride all the way to Sigchos instead of waiting for the next departure at 11:30 am.

Note: In the event of an injury or in the off-chance that you do not want to continue the trek, there are buses available between Chugchilan and most cities, as well as Insilivi and Latacunga. Your hostel should be able to help arrange rides if needed.


Quilotoa loop Itinerary

The day before the trek: Travel from Quito to Latacunga by public bus (they frequently leave every 20 to 30 minutes from Quito’s Quitumbe station) which costs $2.15 and takes 90 minutes. Spend the evening in Latacunga and leave your luggage at Hotel Endamo.

Quilotoa loop day 1: 90-minute taxi ride from Latacunga to Sigchos. Trek from Sigchos to Insilivi; overnight at Llulu Llama.

Quilotoa loop day 2: Trek from Insilivi to Chugchilan; overnight at Black Sheep Inn.

Quilotoa loop day 3: Trek from Chugchilan to Quilotoa. Take a 20-minute public bus ride from Quilotoa to Zumbahua, and take a 70-minute connecting bus ride from Zumbahua to Latacunga; overnight at Hotel Endamo.


Complete Guide for Traditional Quilotoa Loop Trek (beginning in Sigchos)

Quilotoa Loop Trek

We recommend you use google maps for more accurate and up-to-date data.

Day 1: Sigchos to Insilivi // 14 km // 3 – 4 hours of active trekking time

Generally flat road conditions with one challenging ascent towards the end of the day. The route is marked with signposts and spray-painted colors.

  1. The trailhead can be challenging to find, as there is no trekking marker that is clearly visible in the town. First, you will want to identify a large sign that shows the direction for Chugchilan 25 km ahead) and Parroquia Insilivi (14 km to the left). This sign is located on the “open” edge of town. As Sichos is surrounded by hills on three sides, look for the only side that does not have a hill where the sign is located.
  2. Once you have found the large sign, walk left towards Insilivi where the paved road becomes dirt and descends. After a few minutes of walking on this road, you will see several signs clustered for Hostal Llulu llama, Hostal Taita Cristobal, and even one for Hostal Cloud Forest, pointing to the path on the right.
  3. Continue to follow the road, where you will pass a white church painted with red trim and two red crosses on top. Keep trekking, passing the first side path (unmarked) on the right until you see another trail on your right-hand side that is marked with a smaller cluster of signs for Hostal Llulu llama and Hostal Cloud Forest, where you will turn right. After 7-10 minutes on this path, you will need to look to your left for a small footpath in the grass that is unmarked. Some people have stacked a small pile of stones to indicate the path, but it is entirely easy to miss, so be vigilant. This small path descends into the valley and will eventually take you to a road.
  4. Upon reaching the road, turn right. You will continue down the road following a slight left-hand curve, then a right curve until you see another left-hand curve with a small path jutting off of it. The path has a barbed wire fence alongside it, and you can also confirm this is the correct path because, just a few steps into it, you will see a fence post (thin tree trunk) that has been spray-painted green, orange, and white.
  5. Continue along this path until you reach a road and turn right. Continue trekking for about 30 minutes with the river on your left-hand side until you reach two small homes; one with brown walls and the other (slightly smaller) with grey cinder block walls and a small white shack attached to it. Near these homes, you will also see a red and yellow trail post pointing to Insilivi.
  6. Take the small descending grassy footpath that’s located directly to the right of the two homes. This path will take you down to a river and a concrete bridge. **There’s a chance there may be a person standing at this intersection demanding some money to use the path (this happened to us). It does not cost any money to trek the Quilotoa trail, so politely refuse their request and keep on the path.
  7. Walk across the concrete bridge, turn right, and then just 20-30 meters; then you will see a footpath on the left marked with several spray-painted rocks along the way. This path will take you into a steep ascent up a muddy (depending on the season) path until you reach a dirt road, which you will turn left on.
  8. Follow the road for another 20-30 meters, where you should see a small intersection with several houses and farms. There will be a spray-painted marker indicating that you should turn left here (although if you go right, you’ll quickly realize you’re walking into someone’s farm).
  9. Continue on the path that is marked with red and yellow spray paint until you reach a small school with a basketball court and a white building with metal bars over the windows. Turn right at this intersection, and about 20 meters after this; you’ll see a small trail to your right with a concrete column that has been spray painted with the number 7, a llama, and a star. Take this trail to your right, and you will begin ascending with switchbacks.
  10. This ascent is the most challenging part of the day and can take anywhere between 40 minutes to an hour, depending on your trekking speed. The path is straightforward and marked with spray-painted rocks along the way. You will encounter two smaller paths shooting off on the right-hand side, but just ignore these and continue along the main route until you get to the top of the hill and reach a large road.
  11. Turn right onto the large road and pat yourself on the back. The hardest part of your first day is now over! Continue walking on the road for another 45 minutes until you reach the tiny town of Insilivi. As soon as you enter the town (easily identifiable by the large brick church straight ahead), take the first road on your right. If you walk up to the church doors, you’ve already gone too far. You will see Hostal Taita Cristobal at the T intersection (and Llulu Llama if you turn right at the intersection). The two accommodation choices are just steps away from each other.


Day 2: Insilivi to Chugchilan // 12.4 km // 4 – 6 hours of active trekking time

Steep descent the first part of the day, undulations, one challenging ascent, then the day ends with a walk on asphalt into the town of Chugchilan. The route is marked mostly with spray-painted colors and few signs.

  1. The trailhead begins adjacent to Hostal Llulu Llama’s kitchen. Descend down this path and then turn right onto the road after 20 meters. Keep descending until you begin to see a concrete bridge at the bottom of the valley on your left-hand side.
  2. Go across the concrete bridge and continue walking 200 meters, where you will see a trail on your right-hand side that is ascending. Take this path until you reach a dirt road, where you will turn right. Continue for 2km until you see a red and yellow trail sign pointing to Chugchilan where you will turn right. **It should take about 20 minutes from the time you cross the concrete bridge to the time it takes you to get to the Chugchilan sign.
  3. Continue trekking along this path for about 15 minutes until you get to an interesting section where white cliffs flank both sides, and the trail is wide and dusty. Continue walking through the “white cliff walls” for 5 minutes, and you will see a house and a red and yellow signpost directing you to turn right towards Chugchilan. Take that path which will be narrow, and begin to descend.
  4. The trail begins to reveal more adventurous sections with muddy terrain, narrow passageways, and also massive plants. After walking about 15 minutes along this path, you should see another red and yellow signpost directing you to Chugchilan. Continue this way until you reach the base of the mountain.
  5. At the mountain base, the path appears to fork in several directions. Simply go straight across the small muddy ditch (go off the trail to do this if needed), where you should see the path converge again. Walk several steps until you see another fork with marker indications (spray-painted trees) to go right. The correct path will descend slightly, while the incorrect path on the left will ascend.
  6. After 25-30 minutes of continuing along the trail, you will encounter a wooden gate. Pass through this gate and continue along the path where a large farm will be on your right-hand side. You’ll pass through another “gate” made of barbed wire (the wire has since been trampled and is on the ground, so it may not look like a real gate per say).
  7. Keep going on the trail for 1.1 km, where you will see a tall boulder (about 7 feet high) on your left-hand side. During the majority of this time, the Rio Toachi River will run on your right-hand side. Continue along the trail until you see a small grove of eucalyptus trees which you will walk through until you reach a log bridge that spans across the Rio Toachi River.
  8. The log bridge is highly noticeable, with multiple signs for Hostal Cloud Forest on it. Carefully cross the log bridge. Immediately after crossing, you should see a sign for Hostal Cloud Forest, which has been nailed to a tree. Follow the sign and take the path to your left towards Chugchilan. The Rio Toachi should now be situated on your left-hand side.
  9. Continue straight on the trail past the suspension bridge on your left (do not cross), and the path will begin a gradual ascent for the next kilometer. At this point, you will see a wooden shack with a small sign selling snacks and drinks on the outside of it. Turn left on the road in front of the store and head towards the small town of Itualo, which is easily recognizable by a beige and red church and cattle area next to it. As you come closer, you will also see other small buildings, stables, and a school.
  10. Walk past the church, and you will see a path leading up toward the mountain with a wooden sign for Hostal Cloud Forest and Chugchilan on your right-hand side. This trail will take you all the way up and over the mountain, making this ascent the most challenging of the day. The ascent will take anywhere between 35-45 minutes with a distance of 750 meters.
  11. At the top of the mountain, you will face an intersection with a few sparse buildings and several signs pointing in various directions. Turn left and continue on the path (if you turn around 180 degrees, you will also see a sign behind you pointing to Chugchilan). The trail flattens out, and you will continue walking for 1.3km, past a U-shaped cliff of white rock and a beautiful view behind it. This is a great photo opportunity and snack spot.
  12. Continue along the trail, which is marked with spray-painted rocks, and go past a wire fence area on your left-hand side until you reach asphalt road, where you will turn left. At this point, the rest of the day’s walk will be on asphalt. You will see a large official welcome sign for Chugchilan directing you to continue forward into the town. Most of the accommodations in Chugchilan are located directly off of the main road, so as you keep walking in (with a gradual ascent), you’ll come across Black Sheep Inn first, then Hostal Cloud Forest, then Mama Hilda’s, and so on. Hostal El Vaquero is located at the very end of the town (which is also the starting point for the next day’s trek).


Day 3: Chugchilan to Quilotoa // 10.3km // 5.5 – 6.5 hours of active trekking time

A steep descent from the town of Chugchilan down to the river with interesting scenery and diverse terrain. Challenging ascent on a narrow path with slight scrambling over landslide areas. Pass through Guayama San Pedro, with more ascents towards the crater and into Quilotoa town. The route is sparsely marked, with the exception of general signs for Quilotoa. If you are traveling during rainy weather, be sure to check with other trekkers or people at your accommodation for trail conditions beforehand, as there are several steep areas that are prone to landslides.

  1. The trailhead begins near Hostal El Vaquero, which is located on the other end of town (from where you entered Chugchilan the day before). If you are beginning from Black Sheep Inn or Hostal Cloud Forest, it is approximately a 15-minute walk to El Vaquero. Continue along the main road through town. You will see various signs pointing to the left of the hostel near the biblioteca (library). Once you reach Hostal El Vaquero, walk a few steps past it towards the large blue sign that says “Quilotoa – 10.24km”.
  2. Follow the Quilotoa sign and take the path on your left-hand side. For the majority of the day, you will continue to follow signs for Quilotoa, as there will be relatively few trail markers similar to the ones you had seen on days 1 and 2.
  3. Continue on this road until you see a yellow wooden sign that says, “La Moya, Cascada, and Quilotoa – 11km”. At this point, take the small trail on your left-hand side, veering off of the main road you were just walking on. This narrow trail will take you on a descent through tall grass and then up to a yellow farmhouse. Just a few steps past the yellow farmhouse, the path will curve slightly to the left and you will see a wooden sign on your right-hand side that says Hostal Cloud Forest directing you to turn right towards Quilotoa.
  4. This path will continue to descend until you eventually reach the river at the bottom of the valley. As you get closer to the river (which should be on your right-hand side), the terrain will drastically change from a trail to a sharp, switchback descent on loose sand and dirt. Trekking poles are especially useful here to maintain some balance as the footing is tough (also try sidestepping if you are slipping). This narrow path will take you all the way down to the river and directly to the makeshift wooden bridge that you will cross.
  5. After you cross the river, follow the trail for a few minutes, which veers to the left until you see a green sign that says “Quilotoa – 8.2km”. From here, you will begin ascending for the next 40 – 50 minutes until you summit the mountain ahead. About one-third of the way along the trail, there is a cluster of picnic benches and a trash can which is a good location for a rest stop.
  6. There is only one trail in this section, so continue climbing up with special caution for your footing in areas where there have been landslides. You may need to do slight scrambling over rocks depending on the trail conditions. At the summit (woohoo), there is a bench overlooking the area that you’ve just trekked through. This is another great spot for a water break or snack. You’ll see another green sign which states, “Quilotoa – 7.7km,” pointing to the left.
  7. Follow the Quilotoa sign to the left, which is headed for the town of Guayama (pronounced Waima) San Pedro. While this shouldn’t be an issue as long as you are on the correct path, you may want to be aware that there is another town nearby, also called Guayama Grande. Continue on the trail towards the town, and the road will gradually curve left. As you get closer, you should be able to see a giant blue awning in the town. Hike to the large blue awning in town, ignore the first right-hand turn, and walk a bit further until you see the basketball court and make the second right.
  8. Continue to walk through the town of Guayama San Pedro, passing through the first intersection until the road begins to ascend gradually. When you reach the second intersection, you should see a green building with red trim and a brown sign that points to Chugchilan towards the right. You will turn left here and walk until you see a sign stating, “Quilotoa – 4.75km”.
  9. Shortly after the sign, take the first trail on your right. As the road continues uphill and out of Guayama San Pedro, you will be able to see a hostel on your left. At this point, the trail becomes uneven and passes several farms on both sides. This next ascending section takes 30-40 minutes until you reach the dirt road. Along this route, you will encounter a fork with three paths. We recommend taking the left path (the middle path gets you to the same trail but makes you ascend a bit more). Continue on until you reach a large dirt road, and then turn left.
  10. Keep on the trail for about 15 minutes, where you will see a small unmarked footpath on your right-hand side going up the hill. Ignore this path and walk another 5 minutes until you see another small unmarked footpath on your right-hand side that also leads uphill on a grassy area. This turn is very easy to miss and is unmarked, so be on the lookout (picture below)! From here, it will take approximately 40 minutes to the next sign.
  11. As you continue to ascend on this trail, you’ll pass farms and a garden on your right-hand side with barbed wire fencing. Keep trekking uphill until you reach the fork before the trail flattens out. Take the path on the right, and it should lead you to a large sign that states, “Quilotoa – 2.9km”. The trail should now be made of white grainy sand.
  12. Follow the sandy trail, which will eventually begin to veer left. At this point, know that you are very close to the crater lake (drumroll please). You will go on another small ascent which takes you right up to a breathtaking view of the Quilotoa crater. This is a great spot to let out a huge sigh of relief and take a smiling selfie!
  13. If you are facing the crater, the town of Quilotoa is located diagonally ahead on your right. You will want to turn right and take the path that circumvents the top of the crater lake all the way to Quilotoa. This route will continue to yield stunning views of the caldera, so you will have plenty of opportunities to take photos from different angles. As you exit the crater lake area, there are a few smaller ascents and one particular area affectionately called the “path of death” (coined by a tour guide we met along the way), where the trail is extremely narrow. Traverse this section carefully.
  14. Once you reach the town of Quilotoa, treat yourself to a congratulatory drink or meal! If you are wiped out from the trek, there are plenty of places and accommodations to choose from. Quilotoa is also a great place to buy souvenirs, as there are many vendors selling blankets, ponchos, and other handmade goods. Great job on finishing the 3-day Quilotoa Loop trek. It’s time to #treatyoself.
  15. Buses heading back to Latacunga or the town of Zumbahua (where you can take a connecting bus to Latacunga) run regularly until the evening. It’s worth noting the buses to Latacunga run less frequently, so you may need to connect through Zumbahua depending on your departure time (which is what we ended up doing and was easy enough). The direct bus from Quilotoa to Latacunga should cost about $2.00, Quilotoa to Zumbahua should cost about $1.00, and Zumbahua to Latacunga should cost about $1.50.


The Quilotoa loop trek is a wonderful way to see Ecuador differently. We’ve written this guide in hopes that you will find positivity in the Andes Mountains and enjoy the experience as much as we did! If you have any other questions about the trek, feel free to drop them in the comments below.

Trekking Northern Thailand – What to Expect

If you’re looking for an adventure that combines breathtaking scenery, cultural immersion, and physical challenge, trekking Northern Thailand might be just what you need. With its lush jungles, terraced rice paddies, and traditional hill tribe villages, Northern Thailand offers a unique and unforgettable trekking experience. In this region, you can expect to encounter diverse wildlife, interact with locals, and explore ancient temples, all while pushing your physical limits.

Whether you’re a seasoned hiker or a beginner, treks of various lengths and difficulty levels are available, and you’ll have the chance to customize your itinerary to suit your interests and preferences; however, we recommend you look at 8 Things to Know Before Traveling to Thailand. So, get ready to step out of your comfort zone and discover the stunning natural beauty and cultural richness of Northern Thailand (12 miles through the jungles of northern Thailand to the Karen Village).

trekking in northern thailand

Pro Travel Tips for Trekking Northern Thailand

  • Protect: Jungle Juice mosquito repellent
  • Bring: Lightweight Towel and close-toed shoes
  • Eat: Everything offered to you
  • Stay: Overnight in the Karen Village


Your guide will dictate the experience

There are dozens of similar tours in the same location following a similar itinerary. The key difference is selecting a guide and group size that will enhance your experience. If you are traveling with a few friends, we would recommend arranging a private tour. If you are traveling solo or as a couple, try to get an understanding of how many others will be joining the tour. If you want a guide that will take you to a unique experience, it’s best not to skimp out by signing on to an overcrowded “cookie cutter” tour.


An elephant ride

An elephant ride is a popular activity in Thailand, but it’s also a chance to experience the strange and unexpected. As you climb onto the back of these gentle giants, you can feel the power and strength of these magnificent creatures beneath you. The journey takes you through lush jungle scenery and past shimmering rivers, but it’s the unexpected moments that really make the experience unforgettable.

Perhaps you’ll catch a glimpse of a family of monkeys swinging through the trees or spot a rare bird flitting overhead. Or maybe you’ll feel the elephant’s trunk brush gently against your cheek as it reaches for a nearby leaf. Along the way, your mahout, or elephant trainer, will share stories and insights about the life of these majestic animals, giving you a new perspective on their importance in Thai culture. It’s a chance to connect with nature and experience the world in a different way, all while enjoying the strange and unexpected moments that make northern Thailand such a unique and captivating destination.


Chiang Mai’s temples

Chiang Mai’s temples are a treasure trove of strange and unexpected sights, sounds, and experiences. From the glittering gold spires of Wat Phra That Doi Suthep to the serene beauty of Wat Chedi Luang, each temple has its own unique character and atmosphere. Visitors can marvel at the intricate carvings and paintings that adorn the temple walls or witness the daily rituals of the monks as they go about their spiritual practices.

But it’s the unexpected moments that can truly take your breath away – the sudden burst of incense as you round a corner, the fluttering of a hundred paper prayer flags in the breeze, or the sound of a distant gong calling the faithful to prayer. And while the temples are steeped in history and tradition, they are also living, breathing places that continue to evolve and adapt to the modern world. So take your time as you explore the temples of Chiang Mai, and be open to the strange and unexpected moments that are waiting to be discovered amidst the ancient stones and sacred spaces.


Experience the local culture of Karen Village

As a traveler, experiencing local culture and connecting with locals can be one of the most rewarding aspects of your trekking Northern Thailand. When staying in a Karen Village, take the time to interact with your host and the community. Joining in on activities such as a campfire is a great way to bond with the locals and learn more about their daily lives and beliefs.

Be open to trying local foods and drinks, and don’t be afraid to contribute and share your own experiences. You may be surprised at the commonalities you find and the new perspectives you gain. By engaging with the community, you can gain a deeper appreciation and understanding of the culture you are visiting.


Schools of the Karen Tribe

When trekking Northern Thailand, consider visiting the schools of the Karen Tribe and bringing along some small gifts such as school supplies, toys, or candy. It can be a highlight of your trip, as the children are often excited to receive visitors and share their culture with you. You may even be invited to participate in classroom activities or join in on a game of soccer. Bringing some songs or games to share can also be a fun way to interact with the children and create memorable experiences.


We would suggest seeking out experiences that take you off the beaten path and allow you to immerse yourself in the local culture. Embrace the unfamiliar and be open to new perspectives and ways of living. Take the time to learn about the history and customs of the places you visit, and engage with the local people to gain a deeper understanding of their way of life.

Remember to be respectful of the culture and traditions of the communities you visit, and show gratitude for their hospitality and kindness. Take the opportunity to try new foods, learn new languages, and explore new landscapes. And most importantly, keep an open mind and be willing to step outside of your comfort zone.

Travel can be a transformative experience, and by seeking out meaningful and authentic experiences, you can gain a greater appreciation for the world and the people who inhabit it. So go forth with a sense of curiosity and a willingness to learn, and you may just find that the most rewarding adventures are the ones that take you off the beaten path.


Caving Along The Wild Atlantic Way Ireland

Ireland’s Wild Atlantic Way is a painfully beautiful 2,500km stretch of coastline along the country’s western face. Majestic cliffs with multi-colored rock strata resembling the finest layered cake stand nonchalantly along the route with names like Downpatrick Head and the Cliffs of Moher. There are all sorts of things to do and see along the Wild Atlantic Way in Ireland, from wildlife hikes, walking through (or getting stuck) in the Derrigmlagh bog to water adventure sports along the many beaches.

While you’ll see all sorts of advertisements for these landmarks along the route, you might have to do a little digging to uncover one of your favorite activities– caving in Ireland. It’s time to don your Indiana Jones fedora and travel differently by exploring the Emerald Isle underground.

Wild Atlantic Way Ireland

What is Caving? The Wild Atlantic Way Ireland

Caving is also known as spelunking (in the USA) or potholing (in the UK and Ireland). When you go caving, you may be doing a combination of walking, wading through rivers, swimming, crawling through passageways, and adapting to all of the different ways your body can get from one point to another. Caving is about the journey through.

You’ll see ancient formations that have never been exposed to the light of day and will likely be in total darkness, except for the headlamp you entered with. It’s a real treat for your senses, especially for the tactile components. Your hands are great navigation tools to maintain your balance and propel yourself forward, and something you’ll need to get a sense of how the cave system is changing around you.

caving irelandIf you’re lucky enough, you might be able to squeeze through passageways to explore the nooks and crannies inside of a cave.


What should I know before I go caving the Wild Atlantic Way?

Caving differs from traditional outdoor adventure sports because it combines elements of cave science, the spirit of exploration, knowledge of mapping, and the opportunity for unique photography. There are cave systems all over the world to explore, which makes it an interesting activity that everyone enjoys seeking out whenever traveling! The favorite parts about caving are spotting the stalactites (they hang from the ceilings) and stalagmites (they rise from the floor).

Another important point to remember is that you should be prepared to pack in and out all of your waste. You can bet your buttons there won’t be a cleaning crew coming in there after you, so please do not leave any trash behind. That said, there won’t be any restrooms either. Before any caving experience, be sure you use the bathroom beforehand and even consider limiting your water intake so you can avoid doing business inside of the cave. Just like many other natural settings, these caves were formed in prehistoric times and can’t just be repaired if they’re damaged. It’s our duty to treat these places with respect


What kind of animals might I encounter inside a cave?

Every cave is a mini ecosystem of its own and has different inhabitants living in it. Some caves have only a few animals that call them home, while others may have a lot more activity. In the caves, you might encounter the occasional spider, some bats, harmless insects, and glow worms. Other caves may have salamanders, snails, shrimp, and crickets. Of course, some cave entrances might also be occupied by other shelter-seeking creatures, such as raccoons, bears, and foxes. If you’re going with a caving adventure company, it’s highly unlikely that you’ll be in a dangerous situation with any of these mammals.


What should I wear when I go caving the Wild Atlantic Way?

When going caving, it is important to dress appropriately to ensure your safety and comfort during the exploration. It is recommended to wear comfortable and durable clothing suitable for physical activity, such as long-sleeved shirts and pants, to protect your skin from scratches and bruises. Loose or baggy clothing should be avoided, as it can get caught on rocks or other obstacles.

Additionally, sturdy closed-toe shoes with good traction, such as hiking boots or sneakers, should be worn to protect your feet. Head protection is also essential, so wearing a hard hat with a headlamp attached will provide hands-free illumination and protect your head from bumps and falling debris. Gloves are also recommended to protect your hands from sharp rocks and rough surfaces.

Depending on the cave, you may encounter water, so waterproof clothing or a wetsuit may be necessary, along with neoprene socks and rubber boots to keep your feet dry and warm. Always keep in mind that caves can be dangerous environments, so it is essential to be prepared with appropriate clothing and gear.


Ireland is undeniably beautiful inside and out. There’s nothing quite like exploring these cave systems that have been carefully hidden beneath the ground for hundreds of years. The sound of a single drop of water inside a cave is magnified as the noise of the outside world melts away. The rocks feel cool to the touch, and you can’t help but wonder what these sage minerals would say if they could speak. In these moments, it’s just you and the earth. If you’ve gone caving before or plan on going soon, we want to hear all about it in the comments below.

What You Need To Know To Do A Self-Guided Tour Du Mont Blanc Hike

The Tour du Mont Blanc (TMB) is an inspiring 170km trek around the Mont Blanc massif, which begins in France and crosses through Italy and Switzerland. It’s no surprise that it is wildly popular in Europe; not all trails were created equal. The TMB takes the trekker through unbelievable landscapes via snowy mountain summits and gorgeous green pastures where happy cows slowly graze.

Charming mountainside refuges, along the way, whip up hearty dinners eaten in cozy common areas where fellow trekkers share stories of their daily adventures and review maps for the next day. If you’re thinking this might be the right time to see the Alps for yourself, here is everything you’ll need to know to prepare for a self-guided Tour du Mont Blanc hike.

SELF-GUIDED Tour du Mont Blanc hike

Should I self-guide or go with a Tour company?

As many things in life, every decision is multi-faceted. Self-guiding your Tour du Mont Blanc hike can come with many positives, such as lower costs, the opportunity to forge friendships with others on the trail, move at your own pace, and the full autonomy to change plans in case unexpected circumstances arise (such as creating a “rest day” or waiting out bad weather). You are also solely responsible for understanding the trail and necessities needed to complete each day successfully.

On the other hand, if you decide to go with an organized adventure company, there are also many benefits. Your daily lodgings are pre-arranged, which saves a lot of planning on your end. Many of the companies will offer services to send your belongings from refuge to refuge so that you are only required to carry a light daypack. Your guide will be available to answer questions, watch for your safety, and give you tips as you navigate your way through the Alps. You are also traveling with a group, so there is a guarantee you will always be able to ask other people to take your picture as you pose in front of an epic mountain.


Okay, cool. I’m going on to self-guided Tour Du Mont Blanc. What should I do first?

Buy Cicerone’s The Tour of Mont Blanc Complete Two-Way Trekking Guide. Once in this book is in hand, decide whether you want to go clockwise or counterclockwise and how many days you want to allot to the trek. Are you going to do the full loop or partial? Making these decisions will help you decide which airports or major cities you will travel from.

We would recommend reading the introduction and daily route walkthroughs several times. Decide whether you want to stay in the refuge every evening or go full backpacking mode with your own tent. Highlight important parts such as difficult ascents, fantastic photo opportunities, and water/refreshment sources. You’ll be bringing this book along with you during the trek, so don’t be afraid to mark it up with notes.


What is the best time to do Tour Du Mont Blanc Hike?

You will be high-walking in the Alps, so understandably, there is a possibility of inclement weather (depending on the previous year’s snowfall or the early/late onset of cold conditions). Generally speaking, the season may be able to start the last week of June or early July and last until the end of September. The peak season is in August, with the best weather conditions noted in early September.


How many days should I plan for the Tour Du Mont Blanc hike?

The full Tour du Mont Blanc circuit is 170km long and is typically completed within 10-12 days. Depending on the route you decide to take (traditional and alternative are 11 and 10 days, respectively), this number can vary. It’s important to ask yourself whether you might want to take a day off the trail to explore a city/town to rest or if you want to keep charging ahead. We would highly recommend working on one of these “recharge” days to rest your aching body and spend a slow moment enjoying one of these idyllic mountain hamlets.


When should I start reserving accommodations?

You don’t necessarily have to reserve your refuges in advance (you can also walk up if needed), although the peace of mind from advance bookings was invaluable for someone. If you are going a bit later, do note that some of the refuges close for the season mid to late September. Make sure you double-check check dates of operation to have a good sense of availability if you decide you’re going to book on the fly. If you happen to be trekking in August, definitely reserve your spot as soon as possible since this is the busiest season and refuges do sell out.

If you pre-arrange your reservations, the nice part is that most of the refuges require a small deposit (or none at all) for the booking. If your plans end up changing unexpectedly, you aren’t forfeiting payment for a full night. Another point of consideration for reserving in advance is that it also makes you accountable for completing your daily trek so that you don’t mess up your own schedule. While the trekking guidebook does list some places, you found that this Tour du Mont Blanc website was immensely helpful in uncovering other accommodations. To get a sense of what your Tour du Mont Blanc hike might look like, here is one actual 7-day itinerary, including the refuges.


What should I pack?

If you bring it, you’re going to have to carry it. Somehow, it’s easy to forget this when you are packing at home and want to include all of your gadgets and articles of clothing. For a petite female, a 36L pack works marvelously in the 12-15 pound range. Depending on your body size and willingness to carry, you can also use a 50L pack and get up into the 20-25 pound range.

Keep in mind that you’ll be trekking anywhere from 7-12 miles per day with difficult ascents and descents in the Alps. After a while, you’ll feel every ounce of weight on your body. Don’t forget to factor in that you’ll also be carrying water and food, which adds a significant amount of heft, too. Check out 7 day self-guided Tour du Mont Blanc packing list, which will also help you prepare.


What is it like to stay at a refuge?

Outside of the alps, the favorite part about trekking the TMB was staying at the refuges. Even though many of them only offer dormitory-style bed situations, the energy and camaraderie of each place make the entire experience special. We recommend booking half board so you can have dinner and breakfast during your stay.

Dinner is typically served at 7:00 pm and is a loaded multi-course meal with lots of bread, cheese, and dessert. It’s a great time to mingle with other trekkers and get to know some of the faces you’ve been seeing along the trail. Breakfast is usually served around 7:00 am and isn’t quite as exciting. It usually comes with a standard assortment of bread, butter, jam, cereal, and coffee.

To make things even easier, most refuges also have the option to pack bagged lunches for €10. Hot showers are always available (some refuges require tokens to conserve resources), and wifi is also available in some places. As you can imagine, sleeping in a dormitory means you will be subject to noise from other trekkers. Bring earplugs and an eye mask!

For cleanliness, it is also helpful to bring your own sleeping bag liner as most of the refuges do not offer sheets for the bedding. Some of the refuges are quite isolated on the TMB, while others are nestled in larger cities. If you have the opportunity to stay at a hotel in Courmayeur or Champex, we would recommend going for it to give yourself a night of uninterrupted sleep or privacy to chill out.


How should I plan for food and water?

If you don’t plan on buying bagged lunches at the refuges, you can also buy your own groceries along the way or get refreshments along the trail. Depending on when you go during the TMB season, some mid-trail refuges may be open and serving food. Grocery stores are available in the larger towns, so you’ll want to strategically buy enough to last you until you can find the next store. A good practice is to always ensure you have extra sustenance on you at all times (such as granola bars) in case you aren’t able to find a restaurant or grocery store.

We wish you the best of luck as you go forth along your self-guided Tour du Mont Blanc hike! Remember to slow down and enjoy your time in the Alps. As cliche as it is to say, it really is about the journey and not the destination. Every day, the landscapes that reveal themselves along your trek are truly remarkable. If you have any other questions that we can help answer, feel free to drop me a line here. Bon voyage!


7 Day Self-Guided Tour Du Mont Blanc Packing List

Are you planning a self-guided tour of the stunning Mont Blanc? Whether you’re an experienced trekker or a novice adventurer, packing the right gear can make all the difference in ensuring a safe and enjoyable journey. In this guide, we’ll provide you with a comprehensive Tour Du Mont Blanc Packing List for a 7-day Self-Guided hike, covering everything from clothing and toiletries to trekking gear and travel necessities. With this list, you’ll be well-equipped to take on the Tour du Mont Blanc and create unforgettable memories along the way.

Before heading over to 7 Day Self-Guided Tour Du Mont Blanc Packing List, it’s recommended to refer to our comprehensive guide that covers topics such as trekking season, staying in refuges, and the option of a self-guided or company-led trek. This guide is suitable for individuals who have some experience camping or backpacking and want to be fully equipped for any situation. You can also check our Tour du Mont Blanc map & post-traveled itinerary for more details.

SELF-GUIDED TOUR DU MONT BLANC PACKING LIST

First of all, this packing list is designed for travelers and adventurers who want to be well-prepared for any situation during their trip. It is not intended for minimalist trekkers but rather for those who have some experience with camping or backpacking. The items on this list will ensure that you are appropriately dressed for any activity and equipped to handle unexpected situations. It’s important to remember that some items may not be used, such as first aid kits, safety whistles, and GPS, but they can be lifesavers in rare instances. Let’s dive into the Necessities.

Travel Necessities

Traveling can be an exciting adventure, but it can also be a stressful experience if you’re not properly prepared. Here are some travel necessities to consider packing for your Self-Guided Tour Du Mont Blanc.

  • Airline tickets and printed itinerary in a folder
  • Passport
  • Travel Insurance
  • Local currency and bank cards (euros for France and Italy, Swiss francs for Switzerland)
  • Travel passport holder and wallet
  • The Tour of Mont Blanc: Complete two-way trekking guide


Electronics

Electronics have become an essential part of our daily lives, especially when traveling. Here are some common electronics that are useful to bring on the Tour Du Mont Blanc Packing List.

  • Travel adapter with USB ports
  • Chargers and cables
  • Kindle E-reader
  • Camera with extra memory cards and batteries
  • Smartphone – Airplane mode on to avoid roaming charges with WiFi on
  • Headphones / wireless earbuds (optional)
  • Power bank with extra USB ports (optional)
  • Mobile hotspot (pay as you go) (optional)
  • GoPro adventure camera and accessories (optional)
  •  Handheld GPS(optional)


Clothing

It is important to note that clothing choices may vary depending on gender. While we have included the most common clothing options, feel free to supplement them with any additional items that suit your personal preferences.

  • 4 boxers or briefs (men)
  • 8 pairs of underwear (women)
  • 2 sports bras
  • 2 long-sleeve or short sleeve synthetic shirts
  • 1 set of sleeping clothes
  • 1 casual t-shirt
  • 1 pair of casual shoes
  • 4 pairs of Merino wool hiking socks
  • 1 athletic thermal leggings (men’s and women’s)
  • 1 mid-weight fleece or soft-shell jacket (men’s and women’s)
  • 1 down or synthetic parka (men’s and women’s)
  • 1 waterproof rain shell (men’s and women’s)
  • 1-2 hiking pants (men’s and women’s)
  • 1 pair of outdoor gloves
  • 1 beanie hat
  • 1 hat with brim or bill for sun protection
  • 1 pair of sunglasses
  • 1 bandana or buff
  • 1 rain poncho (optional)
  • 1 pair of gaiters (optional)
  • 1 hiking shorts (optional for men’s and women’s)
  • 1 swimsuit (optional if you are going to visit hot springs or pools)

Keep in mind that you should be packing mostly athletic, lightweight, synthetic clothing that wicks moisture quickly.


Trekking Gear

Here are some essential trekking gear items to consider for your Tour Du Mont Blanc hike.

  • 36L to 50L backpacking pack
  • Backpack rain cover
  • Waterproof hiking shoes/boots with good tread to hike through rain, snow, ice, and mud
  • LED headlamp
  • Trekking poles
  • 1L to 2L refillable water bottle or hydration reservoir
  • Several compostable plastic bags to hold your trash (leave no trace)
  • Compass
  • Signaling safety whistle
  • Sleeping bag liner for refuge dormitory beds
  • Quick drying and lightweight microfiber towel
  • Compact first aid kit
  • Lightweight dry stuff sacks to keep your clothing separated and dry
  • Iodine tablets for water purification (optional)
  • Compact multi tool (optional)
  • St-Gervais les Bains, Paper Tour Du Mont Blanc map (optional)
  • Sports wristwatch with alarm (optional)

Remember, the specific gear you need may vary depending on the location and conditions of your trek, so be sure to do your research and plan accordingly.


Toiletries (travel-friendly)

Toiletries are an essential part of any travel packing list. Here are some items you should consider bringing with you. ( This list may vary with gender, so pick accordingly )

  • Daily skin moisturizer
  • Face cleanser
  • Medicine (general assortment)
  • Toothbrush, toothpaste, and floss
  • Shampoo & Conditioner, or pack your own in these reusable bottles
  • Sunblock
  • Comb
  • Contact solution and lens case
  • Deodorant (women’s / men’s)
  • Chapstick
  • Optional: face wipes, q-tips, hair ties, bobby pins, stain remover pen, antibacterial gel
  • Toilet paper/tissues
  • Blister care/moleskin
  • Pain relief ointment
  • Electrolyte replenisher powder mix sticks (optional)
  • Small notebook and pen (optional)
  • Book – I recommend Mountain Lines, a book about a man’s journey through the French Alps (optional)
  • Foldable and lightweight travel purse/tote (optional)

If you happen to forget anything (even athletic clothing), you can buy supplies in the larger towns or cities.

In conclusion, the 7-day self-guided Tour Du Mont Blanc is an incredible adventure that requires thoughtful preparation and packing. We hope this comprehensive Tour Du Mont Blanc packing list will help you be as comfortable and prepared as possible during your journey, no matter what may arise. So, take a deep breath, pack smartly, and get ready for an unforgettable adventure in the stunning alpine terrain of Tour Du Mont Blanc.